Pages

Thursday, April 18, 2013

Busy As A Bee

Time has whipped by like a storm in the night. I have been cooking , baking and preparing my garden for spring. Want to share many new recipes too. When I have more time. Where do I begin. Started with a very small gathering at a friends house. We did a couple of crafts and was introduced to Stampin Up products. Bought a stamp with my name and address in fancy italic, A beautiful and huge butterfly stamp, and an ink pad. Which I have to say that the ink pads are so nice. Very pleased with my purchase. Had an issue with Walmart. Cursed a lot. There was a wrong product mailed to my daughter and it was only a few dollars I was over charged, yet they had two people e-mailing me. One courteous and one rude. The few few dollars was not worth the battle. Letting it go, but weaning myself from shopping there all the time. I have to face the fact that there are some items there that I cannot find close to me and at great prices. So, must tread carefully when buying from Walmart.


My son turned 6. Looking forward to him being more independent. Except, he has been more challenging and wanting to be 4 again. My new goal is to have him start being more independent and responsible. At 40 lbs I just can't do hold you me with out long term suffering afterwords.

Started making more powdered greens. With only greens from my garden. Thought I could sell them at the local farmers with some baked goods. Only to find out that you cannot sell anything you make in your house/kitchen. There is a cottage law that says you can only sell baked goods from your house, but no dehydrated consumables/food. After applying for the market and learning all the legalities, I will be selling my produce and lotion bars and eating all the super green powder myself.


Then another nearby place wants to start a farmers market and I was invited to check it out. It looked great and people have been saying, "Wow, you make enough to sell at the farmers market?" (and two?) I am thinking Oh my goodness, what have I got myself into. I mention selling the lotion bars, but it is like this silent whisper that no one hears. I also need a canopy and moneys for everyday I sell at any of the markets. Think-$$$. Can I come out even and perhaps positive?
                                                        Tangerine tree flower

Now, I am fighting a battle of invasion of the aphids two weeks before starting to sell. Got some Neem oil from a friend across the street. Used it and decided I needed my own for future aphids.
Built two more garden boxes on the side of the house and planted many seeds. Bought and connected drip system hoses in the main garden. My indoor sprouts failed because I listened to the young sales person at the store. They said I could grow my seeds with hummus mulch. Red flag, not true. Had to go back to the store and buy garden soil for produce and add my seeds all over again.

  New Home Depot garden/sand boxes rule. So much easier to put together than their last ones similar to this. You just need a rubber mallet. It's your best friend in the yard.

It is so much easier to say when you fail try try again, but doing it is so painstakingly, laborious and ego crushing. Really have to figure out what is worth my time and energy versus other aspects of my life. Like Summer swimming in the evenings with family. Being home versus working.
                                                                   Before fertilizer

My investment into the garden has been pricey. Mulch, seaweed granules, a bit of miracle Grow. Doing what I can to make everything as organic when possible. My lemon cucumbers are sprouting indoors today. I have seen them and a few tomato seeds move fast through out the day. It is quite amazing to see that kind of action.
 
                                                              After fertilizers

Made tomato cages out of fencing. Will make more if needed. They are the best. I am very proud of them. Got the pool chemicals balanced. Added my name to the large list of HTV's Jacksonville FL. 2013 Home drawing.

Motorcycle races this weekend at the F1 track.


Yeah, I need to step back and kick back a moment. Where is my Kava?
                                                                        Zen
Hope you enjoyed my crazy catch up news. I like to think of my blogisphere as my friend of many minds in one place together. Have a great day.

Thursday, March 7, 2013

Mashed Orange Sweet Potato And Potato Side

This was good and easy. Boil equal amounts of sweet potato and regular potatoes skinned and chopped for 15 minutes.

Drain and put or keep the potatoes in the pot. Add butter, salt, dried orange peel granules or orange rind.
Add some orange juice and mash with bean or potato masher or blend with a hand blender (not the immersion kind. the whip egg whites kind).

This is all made according to the amount you cook and to taste. So, taste along the way.

Slightly sweet and mild. It was a nice change to the average mashed potatoes.


Sauteed Green Beens Onions and Mushrooms

My husband has wanted green beans cooked for him for years. I was only steaming them and never cared for them either. Recently I tried sauteing them. Love them sauteed and whipped up this recipe with great success.

Use:
1 Cup of green beans chopped and thawed if frozen. I just break them in half frozen and then let them defrost.
1/2-1 onion sliced or chopped
1 C. of mushrooms sliced
2-4 T. veggie oil
salt and garlic granules or powder

In a large pan add veggie oil and the veggies. Sprinkle salt and garlic on to taste. Turn on heat to medium and saute for about 10-15 minutes. Lower to a simmer and cover until ready to serve.

To spice things up, you can add some crushed red pepper flakes.


Tuna Salad with Sprouted Mustard Seed

Yes, I am finding easy everyday meals to add my sprouts to. Took a can of drained tuna and pour it in a small bowl. Added and mixed some mayo, pickle relish and some sprouted mustard seeds to taste. That is it. Placed it on crackers and ate. My husband was even temped to try this. I like the idea of eating healthier, but not committing to a totally strict confined diet/lifestyle that forces you make some type of commitment to it.

I also made tater sauce with the sprouted mustard seeds too. Mayo, diced onion, pickle relish, creole spice, and mustard sprouts. Yum.

Read that anything that uses celery can be replaced with radish sprouts. So, I thought, "or mustard sprouts to". And vise versa. Anything that needs horseradish or mustard/ground mustard can equal sprouted mustard seeds.

Collard Stew Recipe (Pot Licker)

I had collected collard greens from my garden. De stemming them and laying them on my dehydrator sheets ready for dehydration when the electricity when out. An hour passed and no electric. Dinner time was coming near and I did not want to waste these precious greens. Grabbed my Ipad and did a recipe search. I changed it a bit and it was glorious. Even my husband liked it. We ate by flash light at the dinner table. The electric turned back on after we finished dinner. I was glad to have a gas oven and a lighter on hand in order to make dinner.

Used:
1 meaty ham bone
1-2 T. veggie oil
3 C. chicken broth or water (I used the chicken broth)
plus 1/2 more water
about 16 oz. of  de-stemmed and chopped collard greens
1 onion chopped
1 bell pepper chopped
handful of fresh parsley chopped or 1 T. dry
handful of fresh celery leaves chopped or 1 T. dry or you can chop a celery stalk
1 tsp. creole spice
16 oz. cooked beans any kind will do or use a can of drained beans of choice. (I used baby Lima beans)

In a large pot, saute onion in oil until translucent. Add the rest of the ingredients. Cover and bring to a boil. Lower the heat and simmer for 30 minutes. Take out the bone and cut of access meat and dice. return the meat and bone to pot. Salt to taste if needed. Mix and serve.


Sunday, February 24, 2013

Cucumber Sprouted Sesame Salad Or Side (No Vinegar)

I tried to sprout sesame seeds and these ones sprouted very slowly. So, I wanted to make something with them. This salad was good. So good that my husband said it was a keeper recipe.
 
One cucumber will make two side servings or one salad serving. I took a cucumber and ran a peeler up and down to skin in a striped pattern. To make it pretty. You can skin it all if you prefer. Then I quartered the cucumber. You can scrape the seeds out, but I found that there really was not much for seeds. I could live with or with out the seeding process.
 
Place the prepared cucumber in a bowl and add some veggie oil (I used olive oil). Just enough to coat the cucumber pieces. Pour a little honey on or other sweet of choice on top (I used honey). Sprinkle on a little salt. Mix, taste. adjust if need be. add some sprouted sesame seeds. I added about 1T. worth. You can use toasted sesame seeds for this recipe too. Mix and serve.
 
Perfect side
 
Everyones happy. Perfect ending.

Wednesday, February 20, 2013

Brown Cow Kefir

I found my cheaper probiotic alternative. Kefir or as I call it Keefir. I have tried these grains before, but was not quite ready for it at the time. So, my using it fizzled out. The good news is that you can go online and buy more. I bought mine from the same place I bought them before at Yemoos.com. They are a good source. I am sure there are other great sources too. I have found that my local Sam's Club sells a gallon of whole milk for 2.99 for now, because as we know prices change. No added growth hormones and not ultra pasteurized.

I wanted just one way to eat/drink this everyday. Making a real food lifestyle addition. I wanted easy and tasty. When I started making my kefir grains again, it took a good 3 days of milk soak, drain and refill of fresh milk. So, the 3rd. milk soak for 24 hours was a complete and successful kefiring. I smelled the batch on the second day and thought, yes that is kefir and it smelled quite pleasant. More so this time around then last. When I tasted some of the kefired milk I thought it was mild, effervescent and very good. I did not remember it being so good. I think I could just drink it plain.

Still needed that one recipe. It is an easy chocolate milk. I call it brown cow because of the effervescent flavor.

Brown Cow Kefir

1 C. of kefir milk (I used cow)
1 T. chocolate syrup of choice or chocolate drink mix powder (For easy homemade syrup,  Add and mix in a small cup: 1/2-1T. cocoa powder, 1 T. sweet of choice, 1 T. hot milk). Wait a minute or two for the mix to be at least Luke warm.

Add chocolate syrup to kefir milk. Stir or shake (be careful of the natural carbonation) with lid on. Drink. So easy. And you can always add more syrup if you like. But this is perfect for me.

Hello Brown Cow.

Sunday, February 17, 2013

Home Made Tent Bed For Single Bed

Kids like to feel safe when sleeping in their beds at night and a tent bed helps. Besides being on the second floor with an alarm system, motion detectors, etc... ug and a down stairs floor that is a walking trap of toys during the day or night. Unless you have mastered the latest configuration. After sleeping many years with my baby, easing my way out of bed when he fell asleep and negotiating my way out of sleeping with him at all. It was a struggle to get him to bed and sleep.

I had used some thinner less sturdy piping to make a tent bed, but it was flimsy and kept falling apart. The good news was that it was keeping my son in bed and falling asleep quicker. My small garden boxes had the same similar thin piping to make a cold frame. That worked, but was not as effective as I would like either. I was doing some Internet research and found info. on cold frame building. So, I got the items to make the cold frame and made an awesome and better cold frame with stronger plastic to cover. I then thought that I could make a better bed tent. And yes, I could and did.

So, off with the babble and down to the info. You need 1/2 inch 10 foot long PVC piping. Found in the a local hardware store. I got my stuff from the Home Depot. For a single bed, you will need 6, 1/2 inch 10 foot long PVC pipes. You will need a pipe hand held PVC cutter. 4, 4 inch long copper or steel threaded screws. Duct tape. Not any fancy stuff. Just the grey/silver stuff. You will also need a good size flat sheet. queen or king size. A hand held drill too.


Start by drilling four holes about 1-2 inches deep, near each end of the wood bases of frames. Now Drill or screw in the screws part to half way in. Leaving an inch or two sticking out. Take a pipe and stick one end onto and over a screw and bend the other side to have the other end fit over and onto the other screw on the same side of bed frame. Use these pictures to help guide you. Take another pipe and do the same to the other side. Now You want to take your hand held pipe cutter and cut 4 of the 10 feet long PVC pipes in half. Use a measuring tape and a marker if needed to mark where to cut.

Now you want to duct tape the 5 foot long pipes to create your tent bed frame. Start with taping the top pipe, then work your way down on each side to create stability. This tent holds best against a wall with out other needed stabilizers. Once you have finished taping, Throw a large flat sheet over and then arrange it to you or your child's liking. I ended up having to add another sheet that cut out access top light and also covered the wall with material. Hence, creating a warm comfortable wall and a more insulated and light filtrating roof. You will have one 5 foot PVC pipe leftover. No big deal.

My son thought this one was to big at first because his other one was always falling and had a low almost cocoon like roof. But he grew to love this one much more than the idea of not having a bed tent at all.
The cost was much less than buying a kid tent bed. Which I had done with my other son and the quality of that one was a challenge. Not to mention constantly trying to pin or tie it to the bed.


Thursday, February 14, 2013

Curried Veggie Sprout Salad Recipe

This was easy and very good.

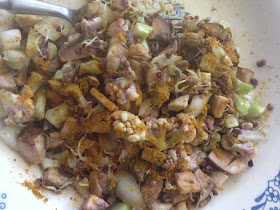
Just take a bowl and add chopped cauliflower, stems included. Chopped mushrooms, sprouts of choice, and chopped onion. I thought The onion was to strong of a flavor and lingered in my mouth long after eating the salad. This ingredient can be added as a very small dose of flavor, deleted or replaced with some chopped green onion instead.

Mix that together. Have even amounts of veggies, less sprouts and least amount of onion. Make enough to serve the amount of people eating.

Now pour some olive oil in the bowl and mix. Sprinkle mix with salt and Curry powder. Mix and taste as you go. Add more of these ingredients according to your liking.

Serve or cover and store in the fridge until ready to eat or serve. I used mustard sprouts and they were good. I also think other sprouts or a mix of sprouts would be great too. The Curry made a great flavor for the salad.

Note to self: Make raw salads bigger. To fill my belly...

As a side note; Happy love day... Love yourself for a day. It is great to have some one special, but that is not always the case for everyone and even if you have some one to love or love you in return. They are not always with you 24/7. Sounds silly, but we are our own best friend. Our most important decision's are made by ourselves and for ourselves. I personally think that one can truly love another only and after they have learned to love themselves. So give yourself a pat on the back, self hug, kiss in the mirror and say I love you me. Have a great day.

Wednesday, February 13, 2013

Sprouting Mustard Seed And Making It An Egg Salad Wrap


It all starts with a seed. I was dreaming about retiring simple near a beautiful beach and I thought about what I would do with out my garden.

Sprout of course and find a great local produce market. So, I thought to try to sprout and see if it is up my alley.

I have a bunch of mustard seed so I put 1 T. in a 3x5 muslin bag. And ran some water through it. Then sat it in a mug and filled the mug halfway with water. It sat overnight. The next morning I rinsed the seeds in the bag and shook out the water. I did this 3 time a day for about 5 days. It can take 5-7 days. Faster when it is warm and slower when it is cold.
A nice sprouting is happening. You have to break up the sprouts in the bag while rinsing. These are ready to eat, but wait.
Now They are looking done. When they looked like this. I just took them out of the bag dry and placed them into a plastic bag and folded over the bag loose. If you want more detailed info. Check out sprout people.com They have utube video, detailed pictures and written info. Their info. helped my confidence beginning this process.

Now that I had sprouts, how was I going to eat them. The mustard sprouts are very spicy. I thought that ground mustard was good in egg salad. So, that is where I went with this.


My first sprouted egg salad wrap was going to be simple. I boiled one egg. Peeled it and placed it in a bowl. Added a bit of mayo. Then about 2 T. mustard seed sprouts. Mixed. Added a little more mayo to taste. Now I warmed up a tortilla placed the salad on and topped with some greens from my garden. Spinach and green onion.


Wrapped that up and we had what I would call perfecto.

The next day I went a different route with the sprouted egg salad wrap.

I processed the egg, placed it in a bowl, mashed with a fork, added  about 2 T. mustard sprouts some mayo, 1 small Bella mushroom diced, about 1 T. diced onion, a little salt and a little more of garlic powder. To taste of course. Mixed, placed on warm tortilla and wrap.


It was a meal. Yum.

Chocolate Raspberry Crumble Recipe

Yes, I was watching Ina on TV. She was making something similar to this. It looked good and it was inspirational. Looked up the recipe at the Food net work site and proceeded to change it to my taste. One time a person was trying to tell me how original I was. My husband and I both said no at the same time. I had said that I learn from the Internet. My husband then said, but she takes things and makes them better. It was a nice gesture on his part and I do like to make changes, yet not everything turns out better. I tell myself to not be afraid to fail and it is better to look like or feel like a fool than to not stand up, forward or react to a potential bad situation, trying to make it better or safe for others.

So, this is the new recipe that I made and created.

White Chocolate Raspberry Crumble

1C. of soft butter
2 1/4 C. of flour
1/2 C. sugar
1/2 C. brown sugar
1/2 C. cocoa powder
1C. rolled oats
1/4 tsp. salt
2 eggs beaten
1 C. raspberry preserve/jam
1/2 C. White chocolate chips

Heat oven to 350F. Grease a 9x9 square pan.
In a large bowl add flour, sugars, cocoa powder, oats and salt. Mix. Add butter and eggs and mix. you made need to use your hands at this point. Split the batter in 1/2 and press half into the bottom of greased pan. Spread preserves on top. Crumble the rest of the batter on top. Bake in oven for 40-50 minutes. When done pull out of oven and cool. When ready to top with chocolate. Place the 1/2 C. of white chocolate chips into a bowl to microwave and melt at 20 second intervals mixing each interval until all is melted, or use a bowl over a pot of a bit of water heating on a simmer to melt. Spoon melted chocolate over the top of crumble. Spread out with spoon if needed. You may want to cut the squares in the pan because it is harder to slice the squares with chocolate after it has fully cooled.

I baked mine for 40 minutes. You can use store bought preserves of any flavor you like and sugar free if needed. I used half white bread flour and half whole wheat flour. This is very crumbly and great reheated.

And OMG. My spell check says's rasberry is spelled raspberry. All my life, I never knew? Is this a joke. I looked it up online and then added red in front of the word. I never noticed the P. Boy I have a spelling handicap.
 

Saturday, February 9, 2013

Coctail Sauce Recipe

This is easy and quick.

ingredients:
1/2 C. ketchup
1 tsp. prepared horseradish (can be found in fridge section of store, Usually in the dairy area. I know it is an odd place.)
1/4 tsp. Worcestershire sauce
1 smidgen of ground cayenne or 1-2 drops hot pepper sauce.

Mix and serve or store covered in the fridge. Double and or triple the recipe for serving more people.

Updated note: If you get burnt out on this and still have leftovers. Add some mayo to it and you get a smooth creamy tarter or thousand island like sauce. Yum.

I like to eat this with what I call pho crab. They are made into sticks like the string cheese except they are not stringy. You eat them cold. There is real cooked fish and or shrimp in these. So if you have allergy to shellfish, read the ingredients. They are a great protein and have omega-3's too. The best part is that they are filling and very low in calories. The pack I got was 1.00. The store sells these in larger packs and different brands. Look in the fish area of market. They are a fridge item in the store.

Try this sauce with other fish and or shell fish. Try warm or cold to see how you like the sauce or fish best.

I have read that you can freeze the pho fish for later use. I have never done that. I do know that the best way to defrost fish/shell fish is by placing in bowl of cool water for about 15 minutes or so depending on how much you are thawing. Serve or place in fridge until serving soon.


Sunday, February 3, 2013

Sesame Coconut Crispy Chocolates

I made my son some white chocolates in kitty cat molds I bought from Amazon. They are for Valentines day at school. I do not measure the chocolate when melting because I am not sure how much chocolate it takes to fill all the molds. I am getting closer though.

After filling the molds, I had extra chocolate. This chocolate would be for me. My little stash. There was only an oz. or 2. I like to use filler to make the chocolate go farther and be less sweet and more healthy. I add some raw unhulled sesame seeds, shredded dry unsweetened coconut and crushed rice crispies. I kept adding until the mix was thicker, fuller and had a wet paste quality to it. I spooned it into another set of molds and tapped to fill and flatten as best as I could. Let sit on the counter then unmolded.

I have no set number for how much ingredients, but I put mostly sesame seeds, then less dry shredded coconut and even less crushed rice crispies. mixed and molded. I did get six chocolates out of the leftover chocolate. This turned out so good with the white chocolate. I am sure these would be just as tasty with a milk, double or dark chocolate.

The weather here is beautiful right now. in the low to mid 70's, sunny. I just want to lay on a carpet in the rays of the sun that enters the room.


Tuesday, January 29, 2013

Painting My Front Door

 
This happened in November of last year. When we moved in to this house a few years ago. The front door was painted black. Like chalk paint. No glossy to it and the sun sets on the front yard and door. OMG. Talk about attracting the heat. I wanted a color that would compliment the house and vise versa. I did not want white or tan. Blah. So, Clary Sage was my choice.

I chose the exact color by first looking on-line at doors with house exteriors that were similar to mine. Then went to the paint store (Home Depot for me) and took several paper color samples that might be a consideration. Then I taped those sample papers to the door and left them there for about a week. Viewing them as I came and left the house at different times of the day.

 I found just the right color and confirming with my husband, for his opinion was important too. Now it was time to clean and dry the front of the door. I sanded the front of the door, scraped edges of inside window with a straight blade. Took brown outdoor caulking and caulked the outer glass window frame. Let that dry for 24 hours. Then taped all around the inside of the window and door handles and hardware with tan paper like tape (I think masking tape is the name). I waited for a warm dry day and a day I could be home for 8-12 hours. Put down painters plastic under the door and on top of my wood floor. I had bought paint with primer in a small can. I got a satin and not gloss. Those were the choices. I asked the guy how much I needed for a door and he gave me a little can and it was plenty. It was pricey, but I wanted this door painted.

I had a paint brush that was about 4 inches wide and a very small water color paint brush for touch ups later. I painted one coat with my son. He insisted on helping. He used one of his kids thick water color paint brushes. The first coat was messy, but having my son help priceless. I told him thank you and I let that coat dry until dry to the touch. That took about 3 hours. Then I painted the second coat. Yes, even with a primer I had to do a second coat. This is usually the case for any color I have had to painting over. Though I have noticed primer helps with painting over dark colors in general. The paint brushes washed out with warm soapy water very easy. I washed out the brushes and layed them out to dry each time I finshed a coat. My brush was not perfectly dry for the second coat, but close and it worked well.

The door felt dry about 4 hours later. Not a complete dry, but enough to take off the tape. (you could use the blue painters tape it is very similar and probably stronger). Now I took my very small paint brush and did tough up around areas where the tape had been.

Finally evening came and I shut the door. I love the color with the black trim. Now I need to motivate painting the trim a better black coat. It is old and coming off. There is also sap seeping out of the wood too. I bet chalk paint was used on the trim too. I will have to get some nicer paint on that at some point.

I noticed today that there is a scratch on the door and it scraped the paint off to the black. Ug. That is what I get for painting a steel door and well this was not a professional paint job. It was a mommy has a day at home and the door is not coming off the hinges type of job. Will have to paint over that again. The worst part is that after I painted and the first freeze came, I noticed the window fogging on the inside. Just in one corner. It is an older home. I am just going to have to live with it for now because I like my green door.


Sunday, January 27, 2013

Flannel Baby Blanket Hand Sew Guide

So, before my daughter gave birth far away to a baby boy. I made a flannel blanket for the baby. I made one for my daughter before she was born and one for my last/youngest son. My dad had some one make two blankets for my first son. My daughters blanket was stolen in her kindergarten class and my youngest son still sleeps with his, even though it is now to small.

I think my daughter understands the significance of the, "special blanket". It was nice to make one with out being very pregnant or like with my youngest, starting it and then giving birth. I stayed up in between feedings and no sleep, during the dark of the night to finish his.

It was my way of showing my love for my daughter and her new child. I had the time to take some photos and perhaps give some one out there some sort of guide on how I made this. I sort of wing this project. There is nothing on paper. Just an idea in my mind turned into a blanket.


To start, you want to buy about 2 yards of flannel material.They can be the same design or different.You also want some filler. The craft/stores that sell material usually sell filler in crib/baby blanket size. If not no biggy you can cut to fit. You can buy poly-filler or Cotton filler. Since poly-filler holds heat better and the baby is up north. That was my choice.

You want thread to match and a needle. buy upholstery needle (large needle with larger eye hole.) if eyes are not very good. You will also need pins and or sewing safety pins. (they are safety pins with a bend in them.) You also need a measure of some sort. A straight measure will work and or a measuring tape, but the ones that can roll into a small ball and fit in your sew kit with a pair of big scissors is just convenient.

More prep: Take your material and place it back to back. Pin all four corners. Now place the filler on one side and proceed to pin all around all the edges. Like picture below. Cut materials so that everything is the same length and width.
Now we want to thread our needle. If you are busy. take breaks and come back to project when ready again. Double your thread with about a double arm length piece.
Now tie your end in a double or triple knot. you will have to do this many times through out the hand sewing and when the thread is getting close to ending or you are done with a sewing area. Knot and trim/cut ends when done with all threading.

Start sewing about an inch from top. End to end and do it twice on each side. Remember to have one side with about 8-12 inches in the middle unpinned. You will need that hole to reverse the blanket before the finishing sew. Click on the picture to get a closer look at the sew and spacing.


Here is another pic. on the other side.You can take out your pins while sewing, as needed.

When you are done with that part. turn the blanket inside out through the un-sewn hole.

Check your work. If something does not look well sewn, you can reverse and fix before final sew.

That last estimated 8-12 inches now needs to be sewn, besides one more thing. Take the last open part and fold the material into itself and pin shut. Now you will sew it shut by loop sewing at the edges. this is the hard part of explaining how to do this. To start, push the needle through to the other side. Pull it over the top of pinned folded into itself part, back to where you started. Push needle through the material again only a few centimeters to the side of pinned opening and then you pull the needle up. pull it through the loop before it closes onto the material. Repeat. This creates a good tight seal. Do the 8 inches twice slightly overlapping the already sewn areas for complete seal. Take pins out as needed while sewing if needed.

Now lay out the blanket and place a pin in about 9-12 places of equals parts on blanket. You want to sew the spot together. Sewing the front to the back just 2-3 times then knotting and cutting (like sewing a button in place, but there is no button.) This ensures that there is no ripping or  misplacement of filler during use and washings.


Short story about my daughters giving birth. I mailed this blanket and the next week she went into labor. She was in labor for many hours and when I called her at the hospital the next morning for the first time since labor began, we talked. About 30 minutes after we talked, she gave birth. She was let out of the hospital the next day and went to the post office on the way out of the city. My blanket had just arrived in the mail. Timing can mean everything and it did in this case.

 Until next time. Hope you have zen moment in your day.

Monday, January 14, 2013

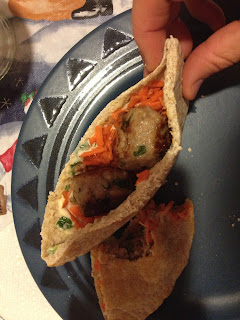
Pork Meatball Banh Mi Recipe

This was surprisingly good. My man even liked it and said he would eat this again. That is a score for my addition to new recipes. Since I am starting to write a lot more recipes, I have thoughts of accidentally re- writing the same recipe twice on the blog. So if I do. No sweat, it just me getting old and reminiscing a great food I like.

Ingredients:

HOT CHILI MAYO                                            Serves about 4
2/3 C. mayo
2 green onion chopped
4 T. sweet Thai chili sauce (I get mine from Walmart Asian food section)
2-4 T. diced jalapeno
about 1/4 C. chopped cilantro

MEATBALLS
1 lb. ground pork
1/4 C. chopped basil
4 garlic cloves, minced
3 green onions chopped
1 T. fish sauce
2 T. sweet Thai chili sauce (Asian food section in grocery store)
1 T. sugar
2 tsp. cornstarch
1 tsp. salt

SALAD FILLER
4 C. grated carrots
1/4 C. vinegar (rice or apple cider)
1/4 C. of sugar
1 tsp. salt
1 T. toasted sesame oil

Pita breads, baguettes, french bread or other bread will do.


You can make this up to a day ahead and keep in the fridge until ready to cook and make. Mix the hot chili mayo recipe in a small bowl and set aside. Mix the Meatball recipe in another large bowl and roll into small to medium meatballs. You can place these on a plate, cover and place in the fridge until ready to cook. Mix the salad filler in a medium bowl and set aside.

When ready to make. Heat a skillet to medium heat and cooking the meatballs. Then set them on a clean plate with paper towels. Take out your bread and warm if you like. Spread the hot chili mayo on eat side of inner bread. Add some meat balls and top with carrot salad filler. Serve and eat.


Sunday, January 13, 2013

Dry Tomato Soup Mix Recipe (Meal In A Jar)

I created this recipe for Christmas gift giving. Thought I could easily convert a wet soup recipe into a dry mix recipe. Unfortunately, I was very wrong. With the idea and the fact that I had bought bulk tomato powder already, my mind said give up or figure out how to do it. Feeling like the show must go on, I started to do the home work/labor. After making and tasting a lot of soup I found a recipe that I liked and made it mine.

Ingredients:                              Serves 4

7 T. Tomato Powder (I got mine from beprepared.com you can also get it at Honeyville.com)
1/4 tsp. garlic powder
3 chicken broth cubes
3/4 tsp. dry basil
1 C. small dry pasta
1/2 tsp. salt
1 T. Pizza sauce spice blend mix (Got this from sfherb.com)
6 T. dry sliced carrots ( You can make them in a dehydrator or buy from beprepared.com)

Add mix to a medium/large pot with 7 C. of water. Mix and cover. Heat to a boil. Mix and reduce heat to a simmer. Cook for 15 minutes stirring occasionally.

You can make this mix ahead of time by adding the ingredients into a glass pint jar with lid. If you want to suck the air out for longer storage. I use a Ziplic handheld pump sealer and a Food Saver jar sealer in a small/regular mouth or large mouth depending on the jar top you are going to use. Place the flat metal part of lid on top of filled jar. Leaving the ring off for now. Place the white Food Saver on top and take your Ziploc handheld pump and place over the hole on top of the Food Saver top. Start pumping until you feel pressure. Put the Ziploc pump down and gently take off the Food Saver top. The flat metal lid should be sealed to glass jar top. If it is not. try the process again. If it is sealed, you can now screw on the ring and place jar in a dark, cool dry place until ready to use.

How long will this stay fresh. I estimate only a year until nutrients start to be lost in the food and the taste compromised. I am only guessing of course.

To make the carrots in a dehydrator, I used a mandolin slicer and sliced the carrots very thin. then place them on dehydrator racks with silicone sheets on them. Dehydrated at 135F until carrot were dry. I bought my mandolin ceramic blade slicer at Cutleryandmore.com.

Another question that may come up is the, "Can I use a differrent spice mix like italian herbs or etc?" Try it. You will never know unless you try.

Peanut Butter Chocolate Balls Recipe and Packaging Tips

This Peanut butter chocolate balls recipe is all over the Internet. Because they are so good. They seem to be a hit with everyone. My tip for packaging, as you can see is placing mini muffin papers in leftover/recycled egg carton holes. I was in an inspired rush to be creative at the moment. Really, I was trying to figure out the best way to store these because nothing I was doing was working effectively. I call it pulling a rabbit out of my hat and that I did. Think, think, think says Poo.. and that is what I did. I collect these until they bulge in my pantry. Just in case, you know a kid craft or something. I had even thrown a bunch away in the recycle bin a week or two before. Lucky for me, I still had a pile rising.

So, after placing mini muffin paper cups in the egg carton holes, place a  peanut butter chocolate ball into each muffin cup in egg hole. You can use this idea for other treats/something else as well. Close the top and tie with string, yarn, ribbon etc...


This is with ribbon.

Ribbon and cotton cooking string.

Now for the recipe for Peanut Butter Chocolate Balls or Bon Bons whatever you want to call these.

ingredients:
2 C. Rice Crispies
1 C. Powdered sugar
1 C. Peanut butter

1 lb. Chocolate for melting

In a medium bowl add rice crispies, powdered sugar, and peanut butter. Mix. Roll into small balls and place onto a plate. You want them small because I think the all over mouth flavor when eating one is much better. I tried both to find this out for myself. Of course, make them to your own taste if this is not to your liking. You can cover the balls and chill in the fridge to firm the balls. Melt the chocolate on a double boiler or a bowl over a pot with some water. When chocolate is melted turn off the heat and dip the balls one at a time with a fork. Then place onto wax paper that has been placed on baking sheets or another  clean hard dry surface. Let cool. Eat or give as gifts.